The first lesson of the official Vim tutorial (“vimtutor”) introduces the navigation keys h, j, k, l. This is where the user might go “What?”, followed perhaps by “What’s wrong with the arrow keys?” The tutorial has this answer: “The cursor keys should also work. But using hjkl you will be able to move around much faster, once you get used to it. Really!”
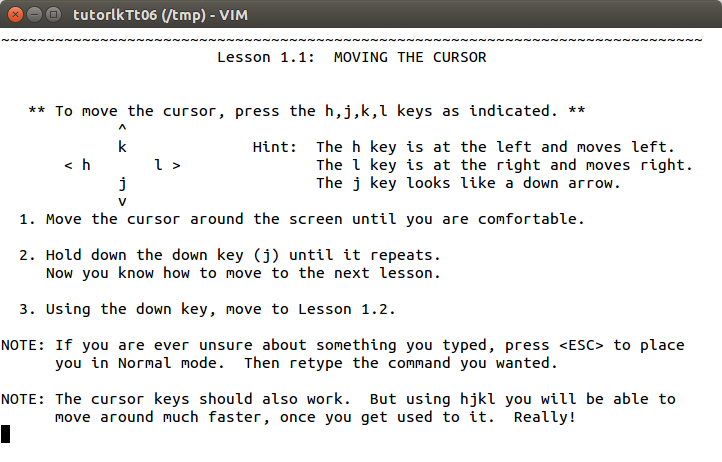
From here, I think most people continue using Vim with the arrow keys and perhaps mouse because that’s what they’re used to, and why change something that works? Users who actually use hjkl from this point onwards (either by sheer willpower or by disabling the mouse and arrow keys) are learning Vim “the hard way”.
Let me say from the beginning that I agree with the tutorial: Using hjkl is better. But for most people the hard way is not the right way. Learning Vim progressively is more fun and will allow you to switch to Vim while still getting work done. In addition to the official vimtutor, you can also try an interactive tutorial, or even an adventure game.
If, however, you are going for the hard way, let me propose learning Vim the harder way!
Learning Vim the Harder Way
The harder way is to use neither arrow keys nor hjkl.
So what do you do instead? Finding out is exactly the point of this exercise.
Vim has a very rich set of motion commands (see :help motion.txt in Vim or
here) that you might never come across if you can get by with hjkl
— just like you wouldn’t learn hjkl if you kept using the arrow keys.
While writing this article, I experimented with various variations on this.
After disabling hjkl, it took some time before I noticed that the sideways
motions h and l were missing (i.e., I use other, more direct motions more).
On the other hand, the up-down motions j and k in many cases are the most
efficient motions when combined with counts (see :help count) and relative
line numbers. Therefore, I do not recommend disabling j and
k completely. But to nudge you into using them intelligently, I suggest
disabling the “repeat keys” feature in your OS keyboard settings:

When this is done, disable the mouse and h and l as well as the arrow keys in both normal mode and insert mode:
1 2 3 4 5 6 7 8 9 10 11 12 | |
The first command, set nocompatible, changes many options from vi compatible
to sane.
You can try these commands in Vim by typing ‘:’ to go command line mode, typing
the command, and then pressing Enter. For example: :map h <nop> followed by
Enter. This lasts until you close Vim or undo it with :unmap h. To make it
stick, put the commands in your vimrc configuration file (see :help vimrc),
and they will be loaded each time you start Vim, until you remove them from
your vimrc again.
Start Learning
At first, the above settings are a pain in the gluteus maximus.
Fire up :help motion.txt and look around. (If you’re tired of
moving down one j at a time, use CTRL-f and CTRL-b to go forward and backward
one page at a time. Or put the cursor on a |keyword| and press CTRL-] to jump
to that subject.)
To use j and k efficiently for editing, enable relative line numbers:
1 2 | |
They look like this:
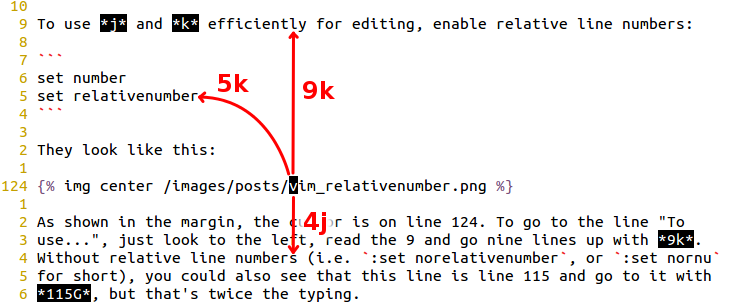
As shown in the margin, the cursor is on line 124. To go to the line “To
use…”, just look to the left, read the 9, and go nine lines up with 9k.
Without relative line numbers (i.e. :set norelativenumber, or :set nornu
for short), you could also see that this line is line 115 and go to it with
115G, but that’s twice the typing.
While getting by with j and k, missing h and l is probably really bad
at first. Take a look at :help word-motions and :help left-right-motions
(which are sections of motion.txt). The six motions f, F, t, T,
(comma), and ; (where (comma) is the comma key itself), will come in
especially handy. To give an example, with the cursor at X on this line and an
‘x’ somewhere later, typing fx will go to that x. (Go try it in Vim!) For
letters more common than x, these find commands are less useful. But uppercase
letters and punctuation are easy targets, and help you navigate very quickly.
Playing around with f and family, you will notice that while they are very
fast to type, they only move within the current line, and of course they only
find one symbol at a time. Read :help search-commands to get into the big
league search commands.
At this point I’ll remark that the search default settings are a bit lame. I prefer these settings regarding search:
1 2 3 4 | |
Especially search highlight can
be useful, but after finding what you were looking for, you might want to get
rid of the highlighting. Rather
than disabling it completely (:set nohlsearch), just turn it off until your
next search with :nohlsearch, or :noh for short.
In addition, when there are many highlighted matches close to each other, Damian Conway’s hlnext plugin helps you see where you’re at by blinking the next hit reached with n or N.
Conclusion
As I mentioned in the beginning, learning Vim incrementally is the most useful. So the harder way is not the best for most beginners. But I think it is very useful for people who use Vim frequently but would like to unlock more of its potential.
Also, we have just scratched the surface of what you can do in Vim. For any
learner, new or experienced, I’d recommend reading :help user-manual from
start to end. This is in fact how I learned Vim.
Update: See also part II.